Overtime Calculation
This article helps you understand how you can manage overtime hours and arrive at project costs and billing using the time codes in Celoxis.
Steps
Define additional Project Time codes for each of your overtime activities and mark them as costable. For example, if you have existing time codes as Research, Design, Development, then create additional overtime time codes such as Research (OT), Design (OT), Development (OT).
Define regular cost and bill (if user-based billing) rates for your users.
In case of Time code based billing, also define the overtime bill rates for your overtime time codes.
Create a ‘Time Entry’ report with below details,
- Name: Overtime Entries
- Select a filter ‘Time Code’ and select all overtime time codes in this filter
- Select a filter ‘User’ and mark it as promptable
- Output: Tabular. Select the columns as Date, Hours, Cost Rate, Bill Rate
- Group By: User, Time Code
When users want to log overtime hours, ask them to select appropriate overtime time code in the timesheet.
When approving time entries, filter the report (created in step 4) based on a specific user E.g. User: Joe Cool. This will display all the overtime entries by Joe Cool.
Now select all the overtime entries and click on bulk edit action.
In case of time code based billing model, select Cost Rate option, and set the overtime cost rate.
In case of User based billing, select the Cost Rate and Bill Rate options and then set the overtime cost rate and bill rate.
Approve the time entries.
Sample Reports
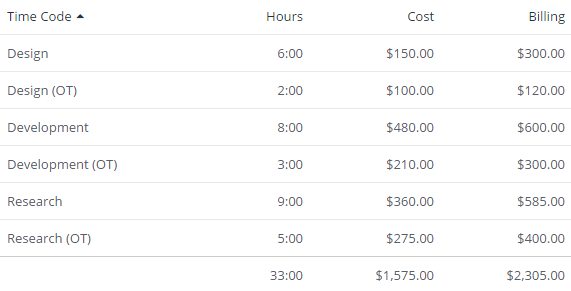
Regular vs Overtime (Tabular Report)
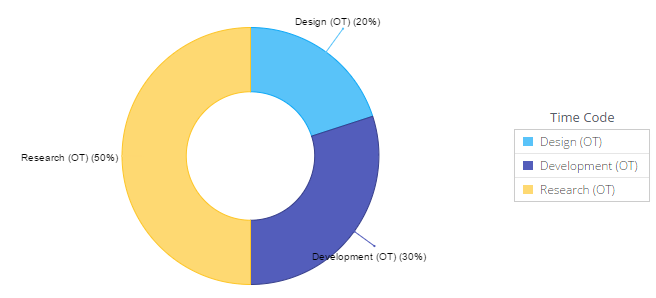
Overtime Distribution (Pie Chart Report)