Managing your Helpdesk Ticketing System
Celoxis is a flexible platform and it quickly adjusts to manage your business processes. This document presents how to set up a Ticketing system with the help of Custom Apps in Celoxis.
Steps
- Configure the Ticketing System App
- Setting Triggers
- Setting Escalation Rules
- Ticketing System App in action
- Setup the Reports and Dashboard
Configure the Ticketing System App
Before you start defining the workflow, it is a good practice to draw that first on a paper so you are clear on the flow in which your ticket traverses. See the example below:

To create the Ticketing System App:
- Log in as a user with Administrator privileges and navigate to Top Menu ▸ ▸ Admin ▸ Custom Apps ▸ Apps.
- Click on the + Add
You will see a form with many tabs. We will cover each tab below.
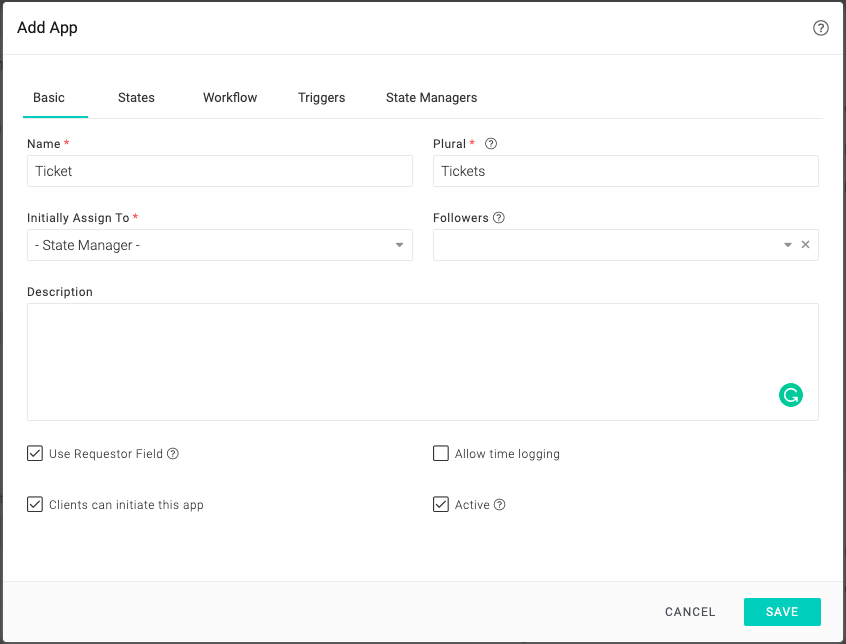
The Basic tab
This tab defines some basic properties of the app
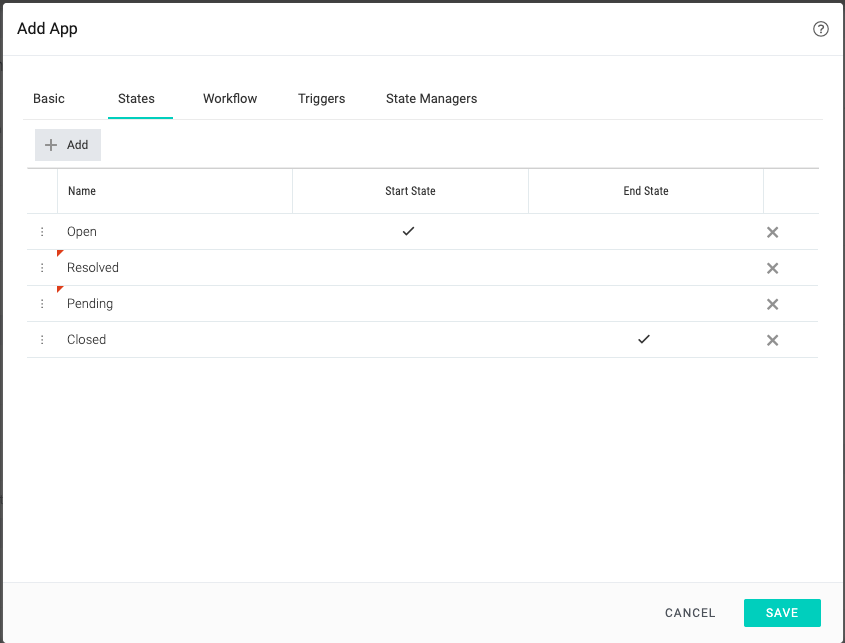
The States tab
This tab defines the states of the app. You can also mark the start and end states in the workflow. We have listed all the states in our ticket workflow.
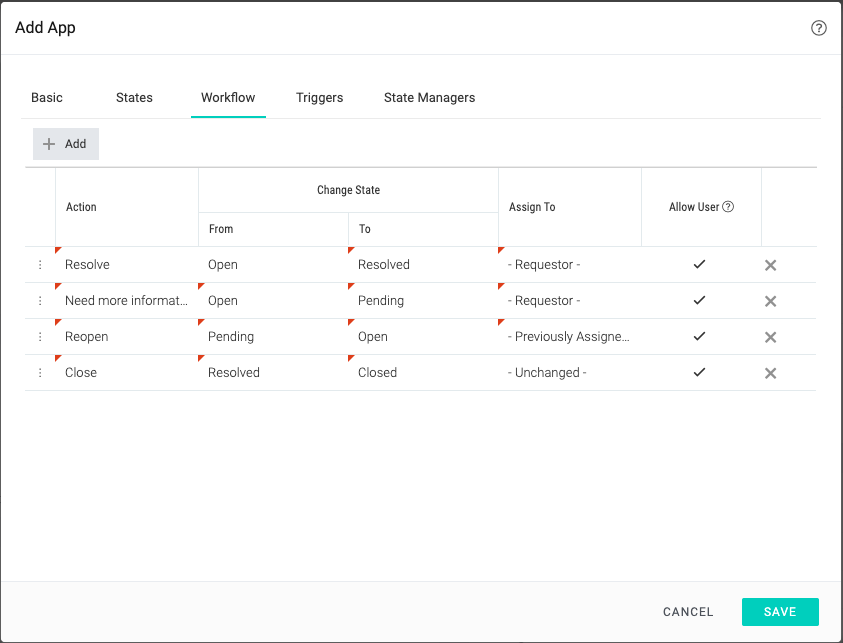
The Workflow tab
This tab defines all the arrows in the workflow diagram. Each arrow represents an end-user action. We shall see more about its usage later on in this document.
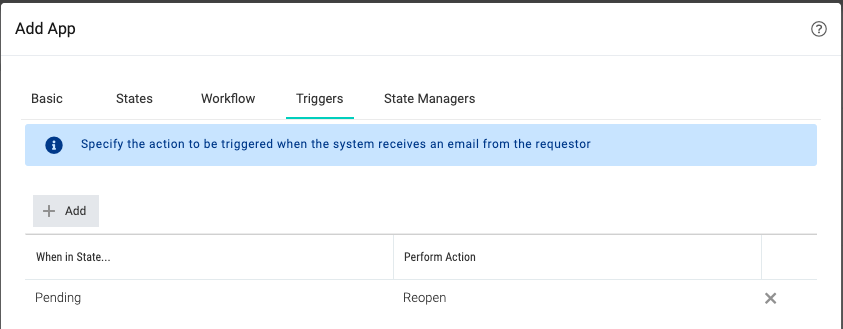
The Triggers tab
Using triggers you can tell Celoxis to perform state transitions when it receives an email from the requestor.
In our ticket app, the requestor will be the person who asked a question. When that person replies via email, we would want the ticket to be automatically moved to the Unresolved state as then it would be brought to the attention of the support team. In other words, we would want the Reopen transitions to happen. In this case, we would be defining our triggers like this:
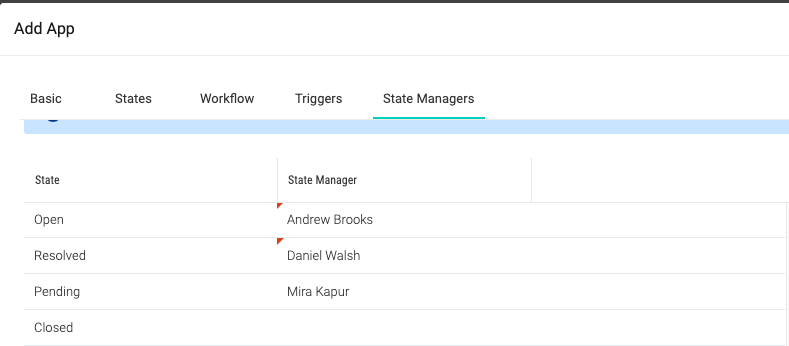
The State Managers tab
A state manager is a user who is treated as a Manager when an app is in a particular state. They are notified when things happen to an item in this state. In our example below, Andrew Brooks is the manager for Open state, so he is responsible for the Open state.
Setting Escalation Rules
You can set rules that define what should happen when an app item exceeds its stay in a particular state for more than the specified hours. This can be achieved by setting Timeout Policies. For more details, please click here.
Ticketing System App in action
There are multiple ways to create a ticket in Celoxis:
- One way is to log in to Celoxis, and then click on Top Menu ▸ ▸ Ticket. Or as a client, go to a project and then click on ▸ Ticket.
- Another way is to create a ticket by sending an email. For more details, please click here and refer to the Direct Interface section
- One more way is to have a web based form on your web site, users can fill and submit this form to create a ticket in Celoxis. For more details, please click here and scroll down to Indirect Interface.
Assigning a Ticket
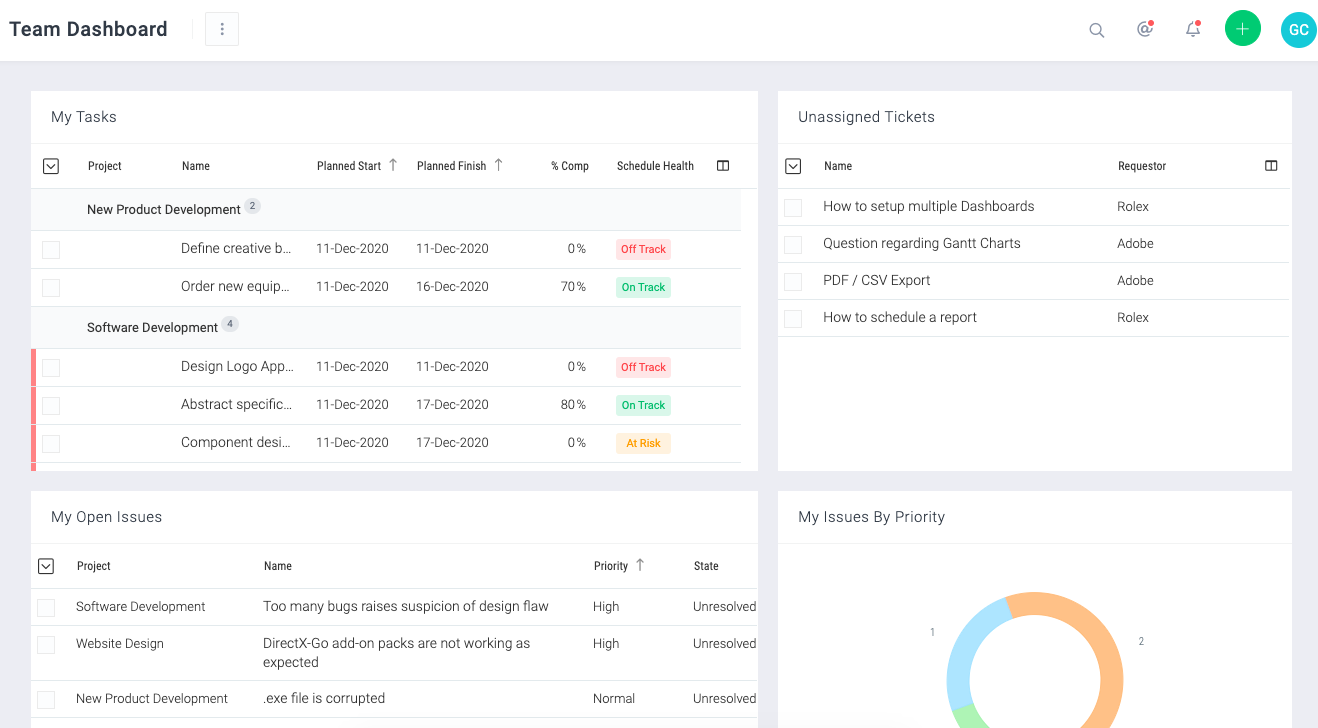
As a support team member, you can see all the unassigned tickets right from your dashboard. Here, you can customize the Team Member dashboard to view the unassigned tickets.
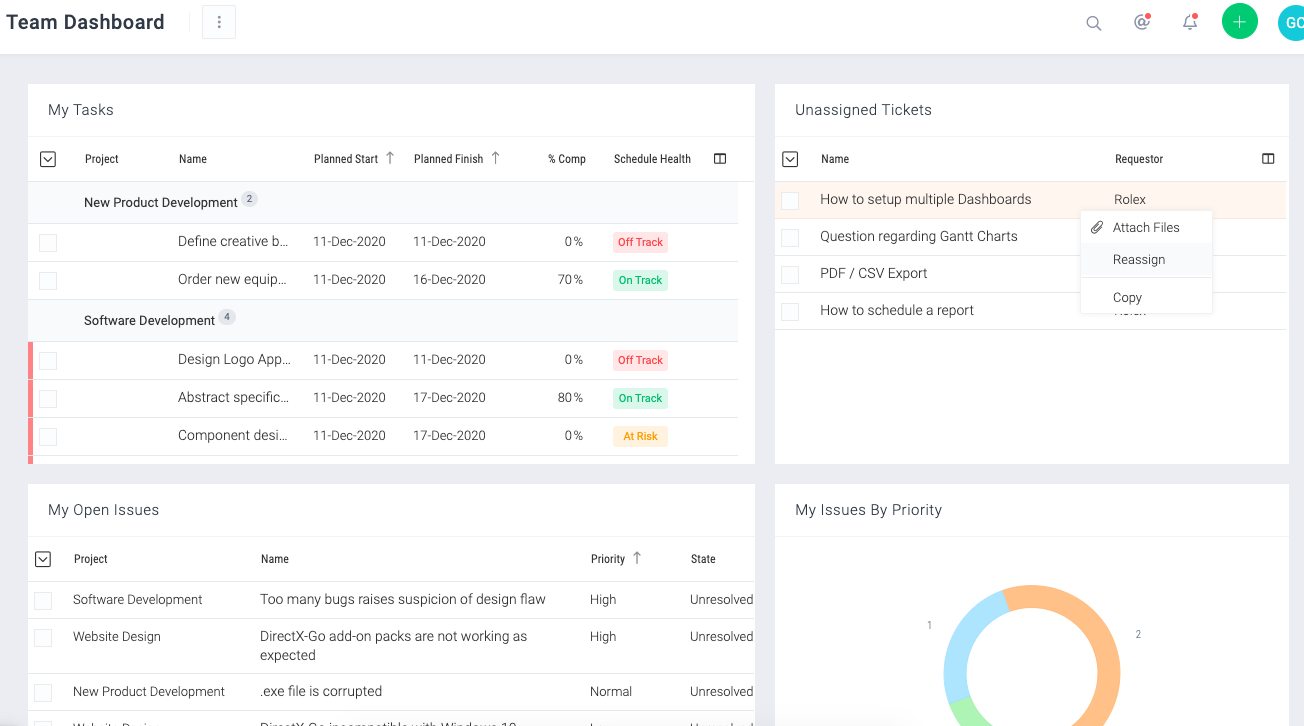
You can then reassign a ticket to yourself and start working on the ticket.
Replying/Resolving a Ticket
Grace has assigned a ticket to herself and clicks on the Resolve button. She then adds her reply on the ticket and selects the option Notify the Requestor.
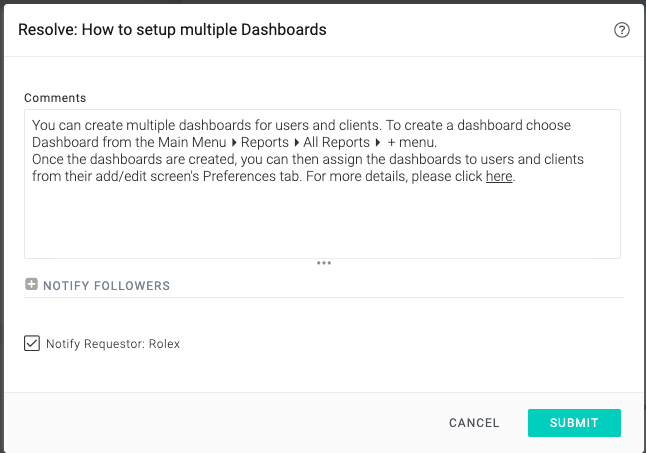
The client will be notified via email. The client can then reply to this email in case he needs more clarification. This will then reopens the ticket based on the trigger we have set above and the will be assigned back to Grace.
Setup the Dashboard and Reports
You can set up the reports and dashboard that will fetch the details so you get an overview of all the tickets.
The following dashboard is set up with reports that will help you to manage this.
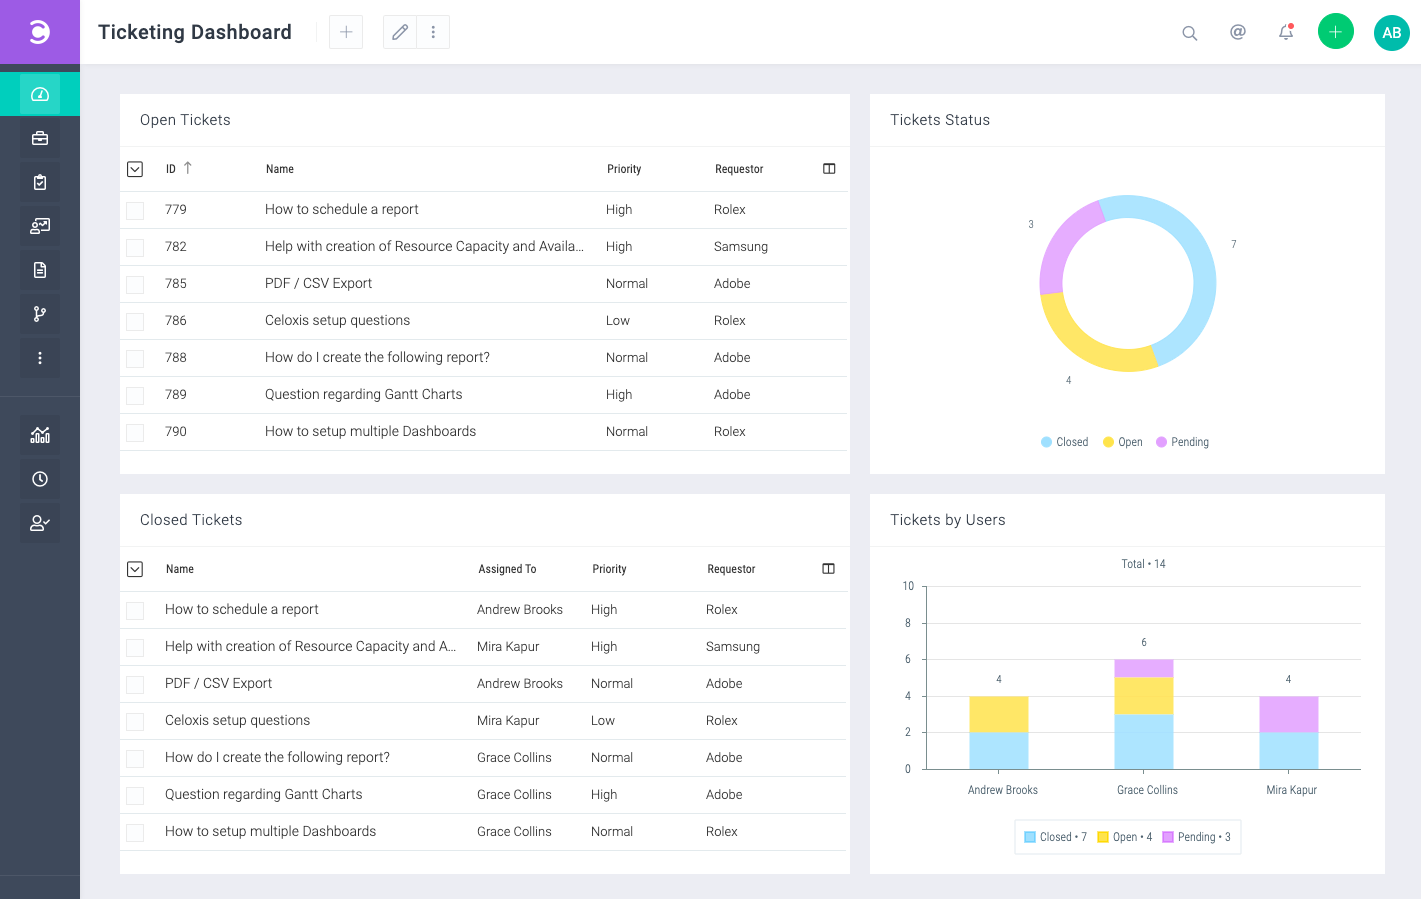
As you can see, the above dashboard is set up with 4 reports:
- Open Tickets
- Ticket Status
- Tickets by User
- Closed Tickets
To set up these reports, follow the steps below:
-
Open Tickets
- Go to Main Menu ▸ Reports ▸ All Reports.
- From the New Report drop-down, click on your App name say “Tickets”.
- Under the Filters tab, set the Open filter to Yes.
- Under the Output tab, select columns like ID, Name, Priority, Requestor, etc. You can pick your choice of sorting.
- Save the report.
-
Ticket Status
- Go to Main Menu ▸ Reports ▸ All Reports.
- From the New Report drop-down, click on your App name say “Tickets”.
- Navigate to the Output tab and then select the Charts tab.
- Click on Pie. From the screen below,
- For Slice the Pie by, select State.
- For Size of slice indicates, select # App
- Save the report.
-
Tickets by User
- Go to Main Menu ▸ Reports ▸ All Reports.
- From the New Report drop-down, click on your App name say “Tickets”.
- Navigate to the Output tab and then select the Charts tab.
- Click on Bar. From the screen below,
- For Type drop-down, select Stacked Bar
- For X-Axis, select Assigned To : Name
- For Y-Axis, select # App
- For Stack By, select State with the adjacent option as On the Same Bar
- Save the report.
-
Closed Tickets
- Go to Main Menu ▸ Reports ▸ All Reports.
- From the New Report drop-down, click on your App name say “Tickets”.
- Under the Filters tab, set the State filter to Solved, Closed.
- Under the Output tab, select columns like Name, Assigned To, Priority, Requestor, etc. You can pick your choice of sorting.
- Save the report.
Now, create a dashboard report (Main Menu ▸ Reports ▸ All Reports ▸ ▸ Dashboard) and add all the above reports to it. You can now select this dashboard to have a live view of your tickets.