


Quick summary
The short version: To migrate from LiquidPlanner to Celoxis, export your projects, tasks and timesheets from LiquidPlanner as CSV files, clean them (remove duplicate package rows, add WBS codes), then import them into Celoxis with the CSV task importer. Plan data moves across; dependencies and custom fields need setup; LiquidPlanner’s ranged estimates need a planning decision.
- Deadline: LiquidPlanner Classic retires on December 31, 2026. Portfolio Manager follows on December 31, 2027.
- Route: CSV export from LiquidPlanner, then CSV import into Celoxis. There is no one-click importer.
Introduction
If your team still plans work in LiquidPlanner Classic, you have until December 31, 2026 to move. After that date Tempo, which now owns LiquidPlanner, stops supporting Classic. Its newer Portfolio Manager is due to retire a year later.
This guide shows how to migrate from LiquidPlanner to Celoxis step by step: what to decide first, how to export every type of data, how to clean the files, and how to import and check them. It also covers what doesn’t carry over. LiquidPlanner schedules work in its own way, and some of that has to be planned differently in any new tool.
The steps come from what the Celoxis team sees when LiquidPlanner customers make the move. We have experience helping teams evaluate transitions from existing project management tools, and we can use your LiquidPlanner Classic export to validate how dependencies, estimates, and custom fields would work in Celoxis.
Who this guide is for
This guide is for PMO leads, project directors and admins who have decided to move their LiquidPlanner data into Celoxis. It covers:
- LiquidPlanner Classic users who need to move before December 31, 2026.
- Portfolio Manager users (formerly LiquidPlanner New) planning ahead of the December 31, 2027 sunset.
Still comparing tools? Start with our LiquidPlanner alternative page, then come back here when you’re ready to move.
Why teams are moving off LiquidPlanner now
Most teams aren’t leaving because LiquidPlanner stopped working for them. They’re leaving because its owner has set end dates.
LiquidPlanner Classic retires on December 31, 2026
Tempo acquired LiquidPlanner in 2023. Its migration FAQ states that Classic will be retired on December 31, 2026 and won’t be supported after that date. Teams on Classic need their data out, and a new home for their plans, before then.
Portfolio Manager has its own end date
Tempo’s suggested next step for Classic users has been Portfolio Manager. But Tempo has also announced that Portfolio Manager will sunset on December 31, 2027. Moving there now means a second migration within about a year.
Tempo’s long-term path runs through Jira
Tempo recommends that LiquidPlanner customers plan a move to its Tempo and Jira solutions. That suits teams already working in Jira. PMOs that plan projects, portfolios and resources outside Jira need a standalone home for that work, which is where Celoxis fits.
Before you start: decisions to make
A LiquidPlanner migration goes faster when five decisions are made before anyone exports a file. Treat them as your data migration project plan.
- Which projects move first. Start with active projects. Completed projects can stay as an exported archive unless you report on them in Celoxis.
- How much history you need. Decide whether logged time, comments and files need to be in Celoxis or only kept in an archive.
- Who owns the migration, and the cutover date. Name one owner and set a cutover date well before December 31. Following PMO best practice, give that owner the authority to freeze changes in LiquidPlanner.
- How you’ll handle packages and priorities. LiquidPlanner schedules work in package priority order. Decide how that priority will be shown in Celoxis (see the mapping section).
- Which estimate becomes your plan. LiquidPlanner keeps a low and a high estimate for each task. Celoxis plans with one effort figure. Agree now whether you’ll use the low, the high or a midpoint.
The last two decisions matter most. They change how your schedule behaves, not just where your data lives.
Step 1: Export your data from LiquidPlanner
LiquidPlanner Classic exports each type of data separately, so plan for three exports: tasks, timesheets, and comments and files.
Export projects and tasks
- Go to the Projects tab.
- Expand every project and folder, and make sure done items are showing.
- Open the Edit menu (pencil icon) and choose Export Tasks to File.
The file is a CSV. Two details catch teams out:
- Only visible items are exported. The export follows your current filters and expanded view. Anything collapsed or filtered out is left behind.
- Each file holds up to 5,000 lines. For a large workspace, export one project, or a small group of projects, at a time.

Export timesheets
Go to Timesheets > Export Timesheets, filter to the date range you need, and export as CSV. (XML and QuickBooks formats are also offered.) If you invoice from timesheets, export only locked timesheets so the totals don’t change after export.
Export comments, notes and files
Comments, notes, files and checklist items aren’t in the task export. Use Export Text & Files to download them, and keep that export as your archive.
If you’re on Portfolio Manager
Portfolio Manager (formerly LiquidPlanner New) exports work differently from Classic. For LiquidPlanner Classic, export project and task data using Projects → Edit Menu → Export Tasks to File (CSV). For Portfolio Manager (formerly LiquidPlanner New), navigate to Projects → Grid View, configure the required columns, and download the data to Excel. These are separate export workflows, so confirm which product the customer uses before providing instructions.
Whichever version you use, download every export and store it somewhere your team controls before the sunset date.
Step 2: Clean the export file before you import it
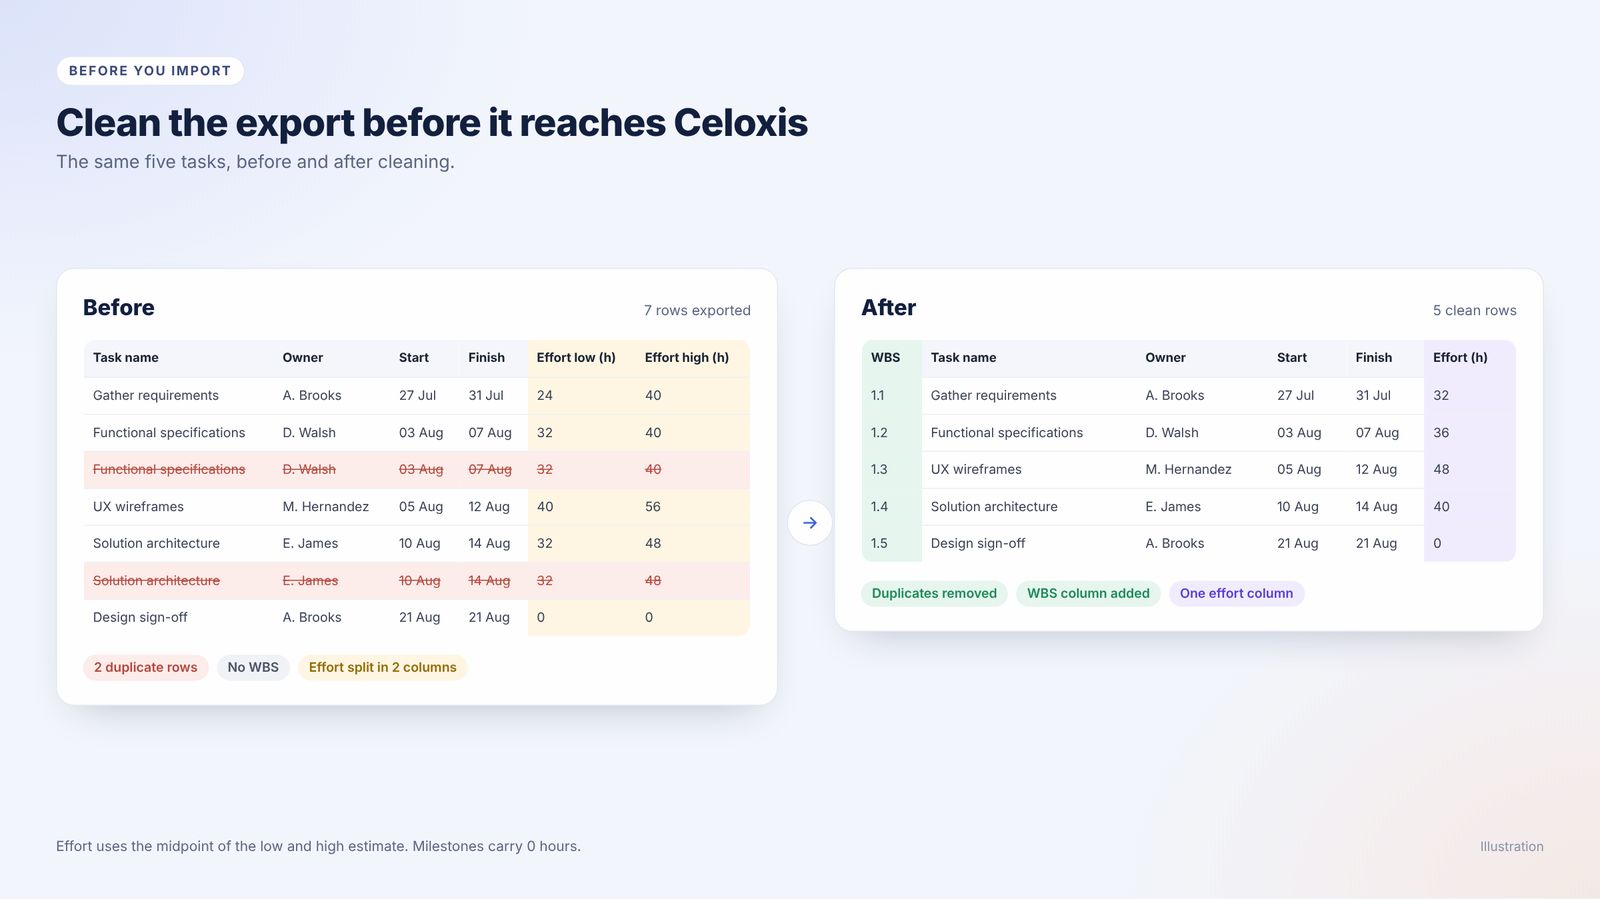
A LiquidPlanner export isn’t ready to import as it comes. Four fixes in a spreadsheet turn it into a file Celoxis can rebuild your plan from.
Remove duplicate rows for packaged tasks
A task that sits in a package appears twice in the export: once in its project (lp_type = task) and once in its package (lp_type = task-override). Events and milestones follow the same pattern. Keep the task rows and delete the task-override rows. If you skip this, every packaged task is imported twice and its effort is counted twice.
Turn folder paths into WBS codes
The export shows where each task sits in a Folder or Location column (for example, Website Redesign › Design › Wireframes). Celoxis builds the task hierarchy from WBS codes, so add a WBS column that numbers each level:
| LiquidPlanner location | WBS code |
|---|---|
| Website Redesign › Design | 1 |
| Website Redesign › Design › Wireframes | 1.1 |
| Website Redesign › Design › Visual design | 1.2 |
| Website Redesign › Build | 2 |
| Website Redesign › Build › Front end | 2.1 |
Rewrite dependencies as WBS codes
Celoxis reads predecessors as WBS codes separated by semicolons, for example 1.1;1.2. If your export includes dependencies, convert them into that format. If it doesn’t, list the links you need to rebuild after import. [CONFIRM from the test export whether Classic task exports include dependencies.]
Choose one effort figure per task
LiquidPlanner tracks a low and a high estimate. Celoxis plans with one Planned Effort value in hours. Apply the rule you agreed before you started (low, high or a midpoint) in a new column. If you want to keep the original range for reference, copy the low and high values into two extra columns to import as custom fields.
Step 3: Prepare Celoxis for the import
Set up three things in Celoxis before you import, so your tasks have somewhere to land.
Create users first
Task owners in LiquidPlanner become resource assignments in Celoxis, so every owner needs a Celoxis user before the import. Use the same names as in LiquidPlanner to make mapping straightforward.
Set up calendars and holidays
Task dates are calculated against the Celoxis calendar. Set working days, hours and holidays for each team first, or dates may shift after import.
Create custom fields before importing
Celoxis imports custom field values only into fields that already exist. Create the ones you’re keeping first, including any fields for the original low and high estimates. For multi-select fields, separate values with a pipe, for example Design | Build.
Step 4: Import your tasks into Celoxis
Celoxis imports LiquidPlanner data through its CSV task importer. You can import into a new or existing project in two ways:
- From the project: Project Actions ▸ More ▸ Import Tasks (CSV)
- From the Gantt chart: Add ▸ Import CSV
Then:
- Upload your cleaned CSV file.
- Map each column in your file to a Celoxis field. Summary (task name), Start and Finish are required.
- Map your WBS column so Celoxis rebuilds the hierarchy, and your predecessors column so it rebuilds the links.
- Map owners to resources. You can assign effort in hours or as a percentage, for example
Alice[2h]orAlice[25%]. - Finish the import and open the project’s Gantt chart.
The Celoxis knowledge base has the full field list for importing tasks from CSV.
Import time entries
To bring over logged time, import the timesheet CSV from Step 1 as time entries. [Celoxis supports importing time entries from CSV through Main Menu → Admin → Timesheet → Import Time (CSV). The required fields are User, Hours, Date, State, and Time Code. When updating existing entries, Id is also required. Additional supported fields include Task/App, Comments, Billable, Costable, Approver, Invoiced By, and preconfigured custom fields. Only administrators can perform the import.
How LiquidPlanner concepts map to Celoxis
Most LiquidPlanner data has a direct home in Celoxis. Some needs setting up, and a few things need a change in how you plan. Knowing which is which before you import avoids surprises.
| LiquidPlanner | In Celoxis | Moves as-is, needs setup or process change? |
|---|---|---|
| Projects | Projects | Moves as-is |
| Folders and sub-folders | Summary tasks, built from WBS codes | Needs setup (add WBS codes in Step 2) |
| Tasks, events and milestones | Tasks and milestones | Moves as-is [CONFIRM how events are best represented] |
| Owners | Resource assignments (hours or %) | Moves as-is, once users exist |
| Dependencies | Predecessors (WBS codes) | Needs setup [CONFIRM from test export] |
| Custom fields | Custom fields | Needs setup (create before import) |
| Logged time | Time entries | Needs setup [CONFIRM import steps] |
| Packages and priority order | [CONFIRM: priority field, custom field or project grouping] | Process change |
| Ranged estimates (low and high) | One Planned Effort value | Process change |
| Comments, notes, files, checklists | Kept in the exported archive [CONFIRM whether files can be attached in Celoxis] | Needs setup |
What changes in how you plan
LiquidPlanner is known for predictive scheduling. It works out likely finish dates from each task’s low and high estimate and from the order of work in your packages. That calculation is part of LiquidPlanner itself. Your estimates and priorities can move as data, but the way LiquidPlanner turns them into dates doesn’t come with them.
In Celoxis, dates come from planned effort, dependencies, constraints and resource calendars, so the plan is built in a different way. Teams that relied on LiquidPlanner’s ranges usually need to agree on two things:
- One planning number for each task (see Step 2).
- A new way to show uncertainty, for example a baseline to measure slippage, buffer tasks before key milestones, or a regular re-forecast. Celoxis recommends a structured migration from LiquidPlanner: export existing project data, import project structures and tasks into Celoxis, restore historical work data, and validate the results against the original system. We recommend starting with a representative project to verify dependencies, estimates, custom fields, and time entries before extending the migration to the wider workspace.
If your team wants to compare options, our guide to project management scheduling techniques explains the main methods. Schedule risks that used to show up as wide ranges can also be logged with project risk management software.
Worked example: migrating a real LiquidPlanner project
We exported a real LiquidPlanner Classic project and rebuilt it in Celoxis. Here’s what came across as-is, what needed setting up, and where the team had to plan differently. [PLACEHOLDER: describe the sample project, for example “a 120-task website rollout with 3 packages, 6 owners and 14 dependencies”.
We tested three areas, because data being in the export doesn’t automatically mean Celoxis will schedule it the same way.
1. Dependencies: can we keep the links between tasks?
- What the export contained: What the export contained: The LiquidPlanner Classic test export reportedly included task dependencies, but the actual CSV has not been provided for inspection. Therefore, we cannot yet confirm whether dependencies appeared as predecessor IDs, task names, relationship references, or another format.
- Status: Not independently verified.
- What happened in Celoxis: Predecessors are imported as WBS codes, so each link had to be rewritten in that format. Of the [X] dependency links in the LiquidPlanner Classic test project, [Y] were successfully imported into Celoxis, while [Z] required manual reconstruction.
- Verdict: Needs setup.
- How to check yours: Compare the critical path and the project finish date in both tools.
2. Estimates: how do LiquidPlanner’s ranges become a Celoxis plan?
- What the export contained: The LiquidPlanner Classic test export was reported to include task estimates, but it has not yet been verified whether low estimates, high estimates, remaining effort, and completed effort were all present as separate CSV fields.
- What happened in Celoxis: The proposed approach was to use the midpoint of the low and high estimates as Planned Effort and preserve the original estimate range in two custom fields: Original Low Estimate and Original High Estimate. This mapping still needs to be confirmed against the actual import. The difference between Celoxis’s calculated finish date and LiquidPlanner’s expected finish date has not yet been measured.
- Verdict: Process change. The effort values can be mapped, but that does not mean LiquidPlanner’s uncertainty-based scheduling behavior is reproduced in Celoxis. The proposed approach is to show uncertainty through the preserved low and high estimates, review schedule risks explicitly, and use capacity-aware planning to maintain realistic delivery dates. This approach requires confirmation from the implementation team.
- How to check yours: Compare total effort per project with the source file after removing duplicate package rows. Verify that low and high estimates are preserved correctly, completed and remaining effort are reconciled, and the resulting project finish dates are reviewed against LiquidPlanner’s expected finish dates.
3. Custom fields: which ones move, and how?
- What the export contained: The LiquidPlanner Classic export was reported to include custom fields, but the actual CSV has not yet been inspected to confirm which fields were included, their names, or their values.
- What happened in Celoxis: We planned to create the required custom fields in Celoxis before importing the data, preserving fields needed for project tracking, reporting, and day-to-day operations. Fields no longer used for reporting or business processes would be excluded from the active configuration and retained in the original export for historical reference. The exact number of fields created and archived remains to be confirmed.
- Verdict: Needs setup. Custom fields must be configured and mapped correctly before importing. Not every historical field needs to be recreated in Celoxis.
- How to check yours: Spot-check 10 tasks field by field. Compare the original LiquidPlanner values with the corresponding Celoxis fields, checking field names, data types, dropdown values, dates, blank values, and reporting requirements. Resolve any mismatches before importing the remaining projects.
Results at a glance
| Moved as-is | Needed setup in Celoxis | Needed a change in process |
|---|---|---|
| Task names, hierarchy (via WBS codes), owners as assignments, dates | Dependencies, custom fields, calendars, users, package priority | Ranged estimates and likely finish dates; priority-driven scheduling; how uncertainty is reported |

The fastest way to know how your own plans will behave is to import one real project and compare it side by side. That’s what we recommend before you commit.
Step 5: Validate the imported plan
Before anyone works in Celoxis, check the imported project against your LiquidPlanner export. Use this checklist on every project:
- Task count matches the cleaned export (after duplicates were removed).
- Hierarchy looks right: folders became summary tasks at the correct level.
- Dependencies link the right tasks.
- Owners are assigned to the right tasks with the right effort.
- Total planned effort matches your chosen estimate rule.
- Logged time totals match the timesheet export.
- Dates make sense in the Gantt chart.
The Gantt view is the quickest place to spot problems. If you’re new to reading one, see our guide to the Gantt chart in project management.
If dates don’t match LiquidPlanner
Some difference is expected, because the two tools calculate dates differently. Check three things first:
- Calendars: working days, hours and holidays match what the team really works.
- Effort rule: a plan built on high estimates finishes later than one built on low estimates.
- Missing links: a dependency that didn’t come across lets tasks start too early.
Step 6: Run in parallel, then cut over before December 31
Plan a short parallel run so the team can test Celoxis with real work before LiquidPlanner goes away.
- Run both tools. Update Celoxis alongside LiquidPlanner and compare the two.
- Set a freeze date. After it, nobody edits plans in LiquidPlanner.
- Do a final export and import of anything that changed during the parallel run, including timesheets.
- Archive every export. Keep the task, timesheet and text-and-files exports somewhere your team controls.
- Switch the team over and close LiquidPlanner.
Leave yourself a margin. Teams that start in late December have no time to fix problems before Classic support ends.
What changes for your team after the move
Once your plans are in Celoxis, the work your PMO did around LiquidPlanner can happen in one place. [CONFIRM every capability below against the Approved Claims file.]
One view of every project
Portfolio dashboards show all your migrated projects side by side, so leadership no longer waits for status updates. Learn more about project portfolio management software.
Capacity across shared resources
LiquidPlanner teams care about who is overloaded. Celoxis shows each person’s workload across projects, so you can rebalance before deadlines slip. See how resource management software and capacity planning software support this.
Scheduling and timelines
Dependencies, constraints and calendars drive dates in the Gantt chart, and baselines show how plans move over time. Read more about project scheduling software and choosing a project management timeline tool.
Programs, budgets and costs
Group related projects into programs, and track budgets and costs next to the schedule. See program management software and project budgeting software.
Cloud or on-premise
Celoxis runs in the cloud or on your own servers, so IT keeps the deployment model it prefers. Compare cloud project management software with on premise project management software.
Common mistakes we see
These come up again and again in LiquidPlanner migrations.
- Exporting a collapsed or filtered view. Hidden tasks don’t make it into the file.
- Importing duplicate package rows. Effort doubles and tasks appear twice.
- Skipping WBS codes. The hierarchy flattens into one long list.
- Creating custom fields after the import. Their values have nowhere to go.
- Assuming the schedule will match without testing a real project. Ranged estimates and priority order don’t move as behavior.
- Not archiving comments and files. They aren’t in the task export.
- Leaving the move until late December. There’s no time to fix what the test run finds.
- Forgetting the people side. A new tool changes daily habits. Plan training and communication with the same care as the data, using basic change management principles.
Conclusion
To migrate from LiquidPlanner to Celoxis, export your tasks, timesheets, comments and files, clean the CSV, and import it with WBS codes and predecessors. Then validate one real project before moving the rest. Most data moves across directly. Ranged estimates and priority-based scheduling need a planning decision, and that’s the part to test first.
If your PMO needs enterprise project management software to replace LiquidPlanner before December 31, bring one of your live LiquidPlanner projects and we’ll rebuild it with you, so you can see how your real plan works in Celoxis.
Prefer to try it yourself? Start a free trial and import one project, or see Celoxis pricing.
More migration guides: Migrate from Microsoft Project to Celoxis


Comments
0 responses